|
Buying a new camera can be a confusing process, how do you know what camera is for you? How much should you pay for a new camera? Which cameras are good for beginners? There are so many points to consider, so I've put together this handy guide to help you decide what camera is good for you.  What do you like to Photograph?This is important because if you like to take photos of sporting events and need super fast auto focus and a fast frame rate (where your camera takes multiple shots quickly) you would look towards a camera that works well in these situations. The FPS (frames per second) is something you would look out for when shopping around. Currently a good camera for fast moving shots is the Canon 90D, which replaced the 80D if you wanted to look at a cheaper model. - I'll post links to places you can buy from at the end of this post. If you prefer to shoot landscapes then your considerations might be more based on mega pixels and resolution rather than frame rate. If you are a portrait photographer you would consider what camera and lens combination give you nice skin tones, if you plan to use the studio and already have your lighting equipment, make sure you avoid buying cameras that have the centre pin on the flash hot shoe removed (mostly canon cameras) You can read more about this here. We have been caught out with this before and it's annoyed a lot of photographers. What is your budget for a new camera?This is arguable one of the most important questions to answer when buying a camera because it determines if you need buy second hand, and the quality of lenses that are available to you. A healthy budget for a beginner camera and basic lens, with up to date tech for that level of camera, is between £300 and £500. Buying a camera for a childChildren are constantly learning, their ability to pick up and learn to use an entry level DSLR (that I recommend for adults) is just as good as an adults ability (and some cases better!) So please don't buy them something more basic or toy like, you will likely frustrate them and pay over the odds for something that is more of a gimmick than useful at inspiring someone to enjoy photography. Megapixels and ResolutionThe resolution is the number of mega pixels that sit across the sensor within your camera - essentially the sensor records the light and the megapixels show you the images that has been created. The higher the resolution (number of pixels) the more detail there will be in your image, this is helpful if you shoot wildlife or from a distance and regularly need to crop into your pictures to help them fill the frame. The more you crop, the more megapixels you lose, so having a higher number to start with means your final image will still have more pixels to make up the detail. Higher resolution images will let you see individual strands of hair on a person whereas lower resolution would show the hair as all together, blocky in colour and not as clear. Landscape photographers tend to want higher resolution images as then fine detail in the scene can be shown in their work. This allows beautiful images which can be printed BIG with no loss of detail. The higher the resolution the nicer the images will look printed. This is why we resize proof and web files to go online, it means if people try to steal and print them they wont get a great result with these smaller resolution files. As a frame of reference, you can print an A3 image with no loss of detail for a 10 megapixel file. (That's small!) Most entry level cameras nowadays are 18 megapixels or higher. ISO RangeThis is one of the most important technical considerations when buying a digital camera. Up until the shift to focussing on mirrorless camera builds, manufacturers put their energy into making sensors work as best they can in low light, this meant a higher ISO range and better quality images at those higher ISO ranges. The ISO setting is the image sensors sensitivity to light, when working in low light the sensor has to work harder to 'absorb' the light and create the image, resulting in a lower quality photo. By working on the ability of the sensors to gather light whilst keeping the quality high, we have a bunch of cameras that work spectacularly in low light. If you find yourself shooting in low light often, you may consider working with a camera that can handle those situations, for example the sony a7 s range are designed to do just that. Weatherproof CamerasIf you shoot wildlife or landscapes you may want to consider a camera and lens combination that is weatherproof, this way you can shoot in the rain without worrying about your kit. This information will be in the camera specifications when you come to buy, so look out for it if it's something you're interested in.  Frame RatesThis is important for people shooting sports or wildlife, the faster the frame rate the more shots you take per second. Great for fast moving subjects. Size, Weight and ConvenienceDifferent people have different requirements when it comes to size. Some prefer a camera that will slip in their pocket, some want a camera with multiple lenses for a range of focal lengths to use for different subjects. Others prefer a bigger camera with a fixed lens and a good zoom. There are a variety of each of these types of cameras suited to everyone's budget. Quite often people choose to prioritise weight and convenience over quality and will opt for a bridge camera such as a p1000 which boasts a super zoom, great for wildlife and shots of the moon. I personally prefer image quality over convenience or weight, so opt for a Pro DSLR camera and good quality (but heavy) lens combination that requires a backpack but gives excellent quality images. The quality of your images is determined by the size of the sensor (the bigger the better as it can collect more light) the quality of your lenses, better lenses give sharper results, beautiful depth of field and gorgeous colours. And finally, your understanding of how to use the camera, if you don't know how to choose the right settings you can be losing quality in your photographs unnecessarily. Lens ChoicesSimilarly to buying a camera, your budget plays a big part in what lens you buy. Lenses are made up of these 6 main elements: Build Quality - How well the lens is made, whether it is weatherproof or not, if it's made of plastic or metal etc. Optical Quality - How well made the lens elements are, better elements provide sharper images and generally weigh more than cheaper lenses. Cheaper lenses are more likely to give you chromatic aberration, where you have green, purple or red fringes around trees or buildings against a bright sky. Stabilisation - How well does in built stabilisation work? Some lenses have excellent stabilisation and will help you shoot with a relatively slower shutter speed in low light situations. Focussing System - How fast is your lens to focus? Faster focussing lenses are usually newer and therefore more expensive. Aperture Range - more expensive lenses usually start with a wider aperture opening (from F1.2 - F2.8) Kit lenses and cheaper alternatives will start between F3.5-F5.6 Focal Length - The range at which the lens zooms in or out. A wide focal length, i.e. 10mm is good for landscapes and interior photos but not for portraits, it causes some distortion which isn't flattering for portraits, but provides a wide field of view so you can see more in each photo, great for making a room look bigger or to show the vastness of a big scene. Some excellent lenses to work your way up to are the 24-70mm F2.8 great for portraits, products and general use. The 70-200mm F2.8 excellent for zooming in for speeches, portraits from a distance, wildlife that's not too far away (perch set up in garden etc) These two lenses are perfect for portrait photographers and are made by Canon, Nikon, Sony and Sigma. The Sigma Art version of the 24-70mm F2.8 is the newest version and is sharper with Nikon D810's (my source is a lens calibration expert colleague who recommended I switch from Nikon to Sigma) and I do really love the results I'm getting from it. Most Popular Entry Level DSLRThe camera that I recommend the most which is an excellent camera for people starting Photography and generally exploring photographing different things, is the Nikon D3500. It has an good ISO range, it's not too heavy, it's relatively budget friendly, easy to use, comes with a general all round lens to get you started with and produces better quality results than bridge cameras, micro four third cameras or compact cameras. It's a great camera to start with because any lenses you buy for this camera can be used with a full frame camera if you chose to upgrade at a later date. It would be hard to find this camera brand new but there will be plenty of people who have hardly used ones for sale having not got into photography as much as they thought they would have. I recommend using Wex Photo Video for all your second hand camera purchases. I make a very small amount of commission on any purchases made through the links on my website. I also can provide more personalised recommendations, please email me if you have specific questions: [email protected] 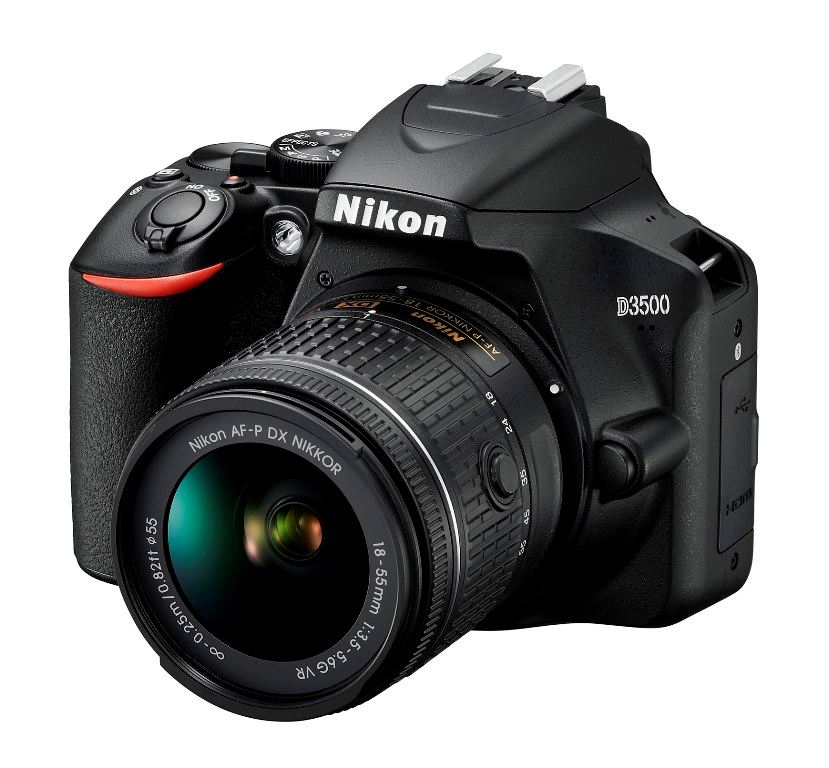
0 Comments
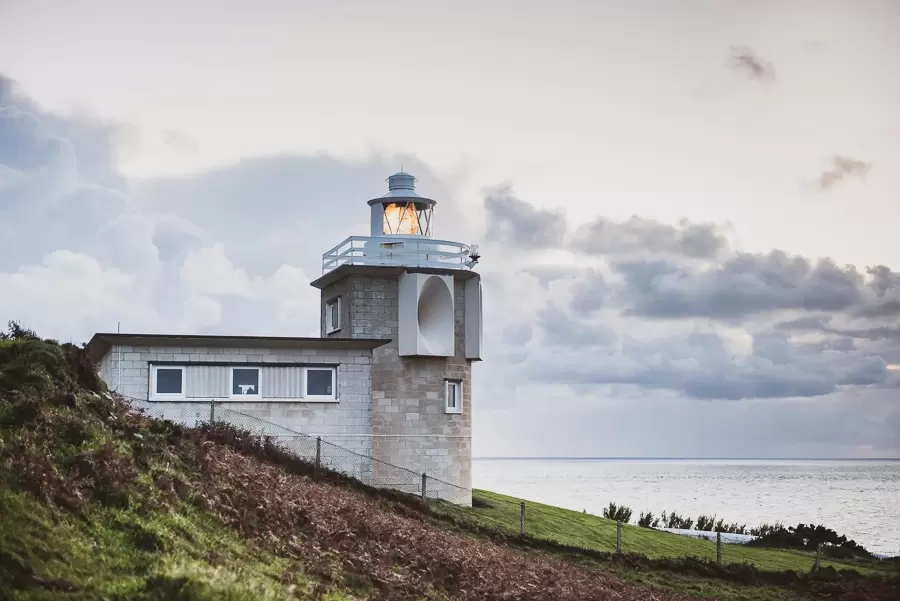
A tripod is number one on my list of kit recommendations for my Photography students. When you learn to use your camera settings properly, you find out that in order to get the same framing and/or the best quality image for landscape, interior, architecture, still life and seascapes, you will need to keep the camera still. This allows you to take the photo slower which in turn gives you better image quality, or, more in focus in your shot.
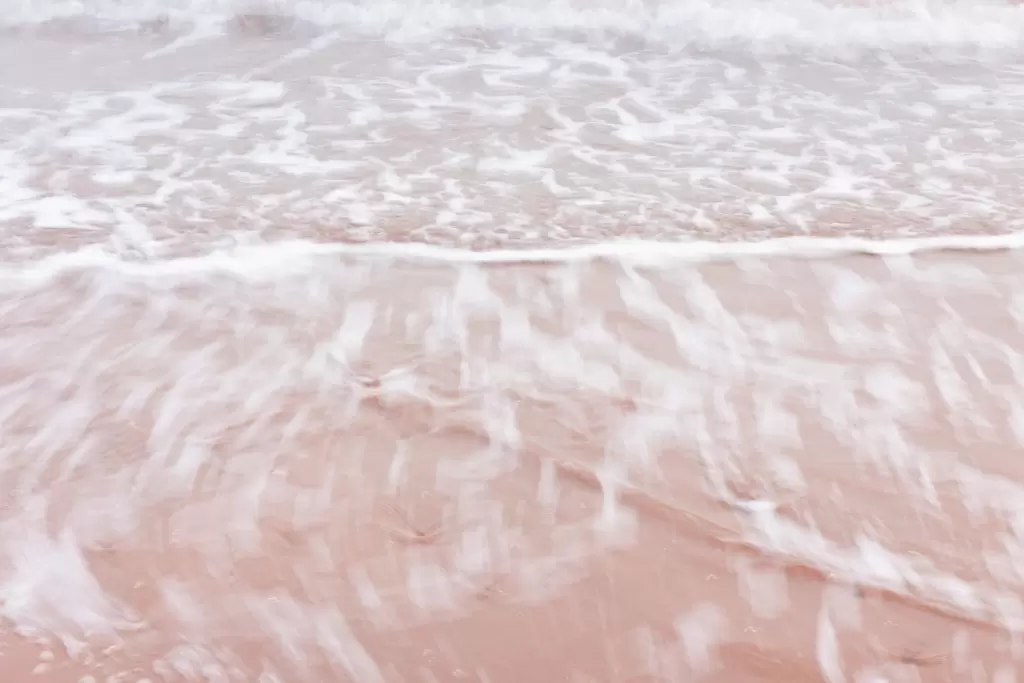
For scenes with a big contrast in lighting, (landscapes and interiors) you would be best bracketing to gain a high dynamic range (details in the brightest highlights through to the darkest shadows.) Bracketing means taking more than one photo of the same scene with a range of exposures. This allows you to then merge those shots on the computer (some cameras do this in camera too). The merged shot will show detail in all the shadows and highlights of your image, gaining a shot with a much nicer exposure overall. Using a tripod in this circumstance means the images all line up and the photos wont show any movement blur or camera shake. You can also be super creative with a tripod. You can take light trails and show movement in your images too. Here are some example photos that can only be taken with your camera kept still (preferably on a tripod.) Light trails of car headlights taken with a long exposure time of 30 seconds. 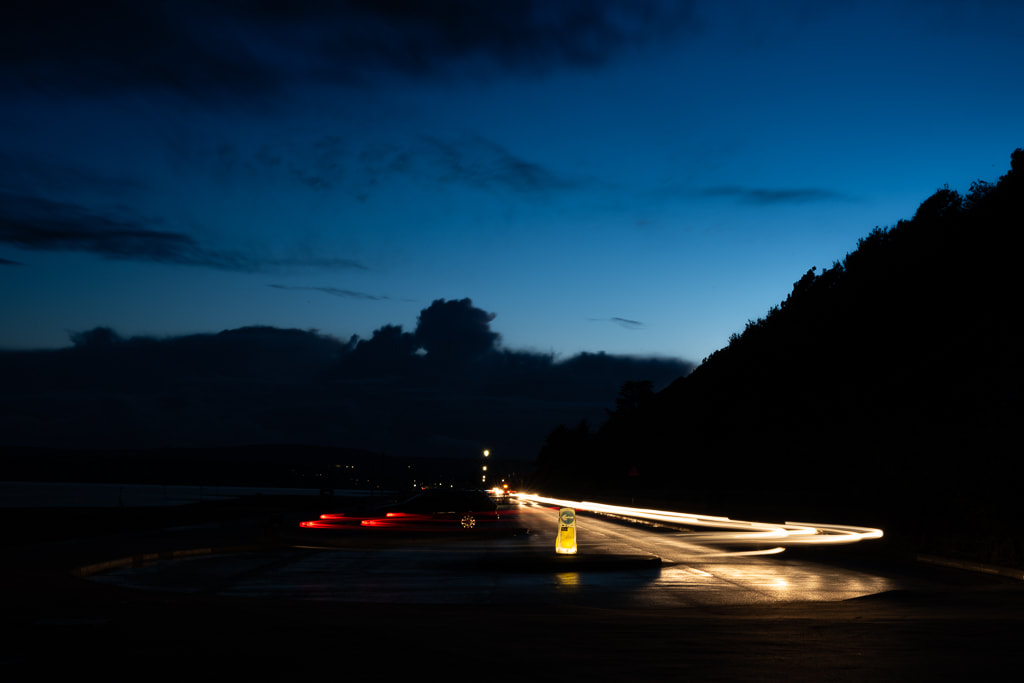
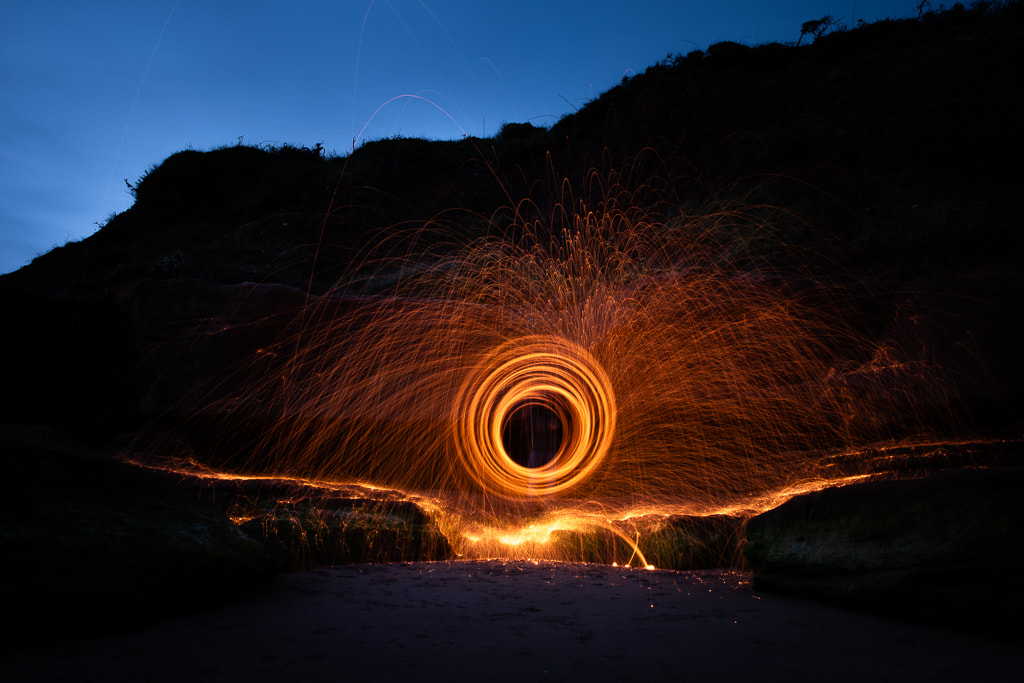
Wire wool long exposure - set fire to the wire wool and spin it round in a whisk attached to some string for this effect. (Making sure to tidy up after yourself afterwards)
Landscapes with lots of detail.
Showing movement in water
Small Budget Tripod Recommendation
If you are on a tight budget and don't mind a more fiddly tripod, that's not the best quality, is a little bulky but will hold your camera still, you can look at an Amazon basic tripod. The down sides are the legs take longer to extend than my other suggestion, there is no quick release plate so taking the camera off and screwing it on is more time consuming and fiddle. You do get a carry bag and these tripods tend to last a long time if you look after them.
Finally there are less positions in which you can move the legs so your shooting position is a little limited when you want to take photos lower to the ground, or if you want to shoot facing downwards. Overall this is a great tripod for beginners who are not sure if they would definitely use a tripod for their photography or for those on a smaller budget. Click the picture to head to Amazon's website via my associate link. This tripod is £17.47 at the time of writing this.  Medium Budget Tripod Recommendation
If you're sold on the idea of a tripod and want one that is easy to setup, pack down and quick to attach to your camera, then I would suggest a K and F Concept Tripod. This next suggestion is the one I use. I occasionally use my tripod, in the studio and on location for day trips, seascapes and long exposures. I don't go on big hikes to take landscapes, so if you are looking for something you can hike with, look at my next suggestions for a lightweight, smaller tripod.
The beauty of this tripod for me is that the legs are rubber screw rings, as opposed to levers, and when extending you can get them to the position where all it takes is a good hand placement and a half turn to loosen them enough to fully extend each segment with ease. Then, when you are done, and you have pushed the leg sections in, it's just one half turn again with your whole hand covering the rubber screws to tighten them. Nice and quick! It also has a quick release plate which you can leave in the bottom of your camera and easily attach to the tripod with a One of the legs completely unscrews and allows you to use it as a monopod which is helpful for steadying the camera a little but it won't do the same job as a secure tripod. There is also a material grip so if you're carrying it in cold weather conditions you don't have to hold the metal, saving your hands from getting uncomfortable. The legs extend really wide to allow low down shooting positions and you can also shoot with the camera facing downwards, if needed. It's got a really nice build quality, comes with a carry bag and has a ball joint to move the position of your camera, no more slightly leg adjustments to make the camera level. This tripod is £114.99 at the time of writing this. Click the image below to follow my associates link to Amazon.  Big Budget Tripod Recommendation
If you are a walker and are looking for the best, most compact, lightweight tripod and you have a big budget, this peak design tripod might be the one for you. It folds down to the same diameter as a drinks bottle, is made of carbon fibre and is beautifully designed.
The legs extend far and are flexible in it's positioning for those low shots if you need them. It holds an impressive 20lb worth of kit, designed for a camera and a telephoto lens. It's pretty pricey at £649 at the time of writing this, but the weight it saves when hiking might just be worth it for those of you who like adventuring. Click the image to go through my associates link to Amazon.  I love Photographing weddings. The joy on people's faces when the Bride and Groom say 'I Do' - it's great. It's lovely capturing hugs, laughs and tears of happiness. Recording the celebrations throughout the day with lots of happy people, food and music in beautiful venues makes for a lovely job. But you do need to know what you're doing as a Photographer. Often, you're working in tricky lighting situations, fairy lit barns, dark ceremony rooms and so on, having the right understanding of lighting, both ambient and flash, and how to use your camera settings is essential for capturing good quality images. There's so much that goes into taking a good portrait shot and I love the challenge working with big groups on big days. Christine and Adrian's wedding was lovely, they got married at Taunton registry office with their friends and family surrounding them, I was pre-notified that I would be able to tell the difference between the two families, one considerably smaller in stature (but not personality) than the other. Everybody was lovely and I set about my task to get shots of everyone candidly but also within their formal groups too. I had two hours to capture everyone, we got some lovely shots, including a nice one of the bride and groom by the beautiful doorway, with a little Photoshop to remove fire extinguishers, that shot stood out as my personal favourite of the day. I prefer to shoot shorter weddings as I suffer with chronic fatigue due to a sleep disorder. - This means I work efficiently, getting shots of people quickly and in an organised way. My system means that I get all the shots you would expect, ring shots, flowers, details, the kiss, candids, posed, kids having fun, confetti and everything else that is possible in the given time frame. I'm a woman on a mission when my camera is in my hand. I hope you enjoy looking through Mr and Mrs Welch's photos. If you would like to order any canvasses or a set of prints please let me know by emailing [email protected]. Similarly, if you liked my style on the day and would like me to photograph your wedding, event or family let me know in an email and I'll get back to you pronto. (In Summary - Everything useful I learned in college and university about Photography, I could have learned in less than a month with the right tutor. So I became that Tutor for people who don't want to take years out of their lives heading into formal education and get into a lot of debt to do so.)
In my college years I decided I would go for the sensible option and study topics that I thought would give me a good career. I didn't choose anything creative. After my first year I asked to add Photography as an additional AS Level but wasn't allowed as it was a popular subject and I would only be able to do one years worth of study on it. So... me being me and not liking being told no, I jacked in the boring sensible subjects and moved an hour down the county to take Photography as a BTEC National Diploma and studied Business on the side. It was much better having the freedom to take photos as often as I liked, we spent A LOT of time cutting and sticking and writing about the photos. We also spent a huge amount of time in the darkroom, and, while I get that it's important to know where Photography started, I didn't feel the darkroom practice was particularly useful moving forward using Photography as a career path. I don't remember learning about Shutter Speeds, Aperture and ISO in class, but I do remember asking Photographers on Flickr.com how to make my photos less fuzzy and gain clarity, like the shots I admired on their Photostreams. I got my answer there, to try and not shoot slower than 1/125th of a second when handheld. This led me to trying out this setting one evening indoors, I noticed my camera wouldn't take a shot at 1/125th without being underexposed (way too dark) and that's when I realised I needed to be working with more light than I had. I learned a fair amount about Photoshop in class with one teacher in particular who knew his stuff, he was technically a graphics teacher, but as with most public colleges and schools now, teachers, and even technicians are spread thin to teach a range of subjects, that they themselves aren't fluent in. This is often to the detriment of the students who don't know what they don't know and sadly aren't always taught the in-depth knowledge that they need to know - I certainly wasn't. We also had studio equipment, we knew how to put the lights on the stands but we didn't know where to position the lights or subject, how to make the lights flash or anything more than turning the lights on and pointing them at the backdrop. When I say 'we' I'm not just talking about the students. Thankfully my keen interest in Photography meant that I was learning outside of college, asking other Photographers for advice and tagging on to group shoots as an assistant and photographing want-to-be models in exchange for photos. Some of whom I am still friends with today. After college I wasn't sure about University, I left it a bit last minute and decided to apply for just one, as it had a good reputation and it was in the same town as my Dad lived in, he had a big house that my Grandad left him so I could stay with him while I studied at University. I went for an interview at the Arts University. After a while, I received a conditional offer to get in, which I already knew I had the grades for, I remember being so happy when I got that letter, knowing I had a 1 in 7 chance to get in. I was thrilled! Before I even got to Uni, I struggled, I had been living alone or renting a room for some time before applying for Uni, student loans were super unhelpful, they didn't accept that I had lived on such a low income as I only rented a small room and didn't make much money whilst at college. I asked for support from a lot of people; family, staff at the University, all who said they wouldn't/couldn't help, either with forms, contacting student loans on my behalf or just with relevant advice. I was pushed from post to post. Eventually, I was given the minimum amount that student loans would provide, £3700 for the entire year... Thankfully, I was living with my Dad, but I did still have to pay rent. I'm going to be real with you now. It was HARD. I hardly ate anything, I couldn't afford to, I was running a small car and my energy levels were at rock bottom. (I have since been diagnosed with sleep apneoa) I didn't have the energy for a job and Uni work. I was really unhappy living away from my partner at the time and would often drive back to his for the weekends where I mostly just slept or worked on assignments. He helped me with fuel costs and his family were lovely to let me stay with them and feed me. My first year at Uni was ok, we learned even more darkroom practice, including bigger film formats and colour processing, all of which still haven't been useful for me in my career as a Photographer. We also actually learned to use the studio, which was great. I took many notes from the studio sessions so I could best remember what I was taught. We mostly learned using film cameras and polaroids but you could book out the studios in your own time to shoot digitally too. I loved the studio side of Photography and it was really nice to have properly learned how to use the studio lighting, learn about lighting patterns and where to position the lights for different effects. One of our sessions at university, we were asked to bring in our printed portfolios. These cost a lot to print because ink and paper is expensive. On the day of sharing our work, the lecturers brought in bottles of beer for everyone to drink whilst looking over our portfolios. I found this quite strange and it annoyed me because I was there to learn. University for me wasn't about partying or getting drunk, I didn't want people drinking whilst looking through my work. This party culture was regularly promoted by lecturers, organising nights out at local bars and generally trying to bond with students in this way. It quite frankly, wasn't for me. After a while of being at Uni I realised just how self led that level of education was. There were some weeks where we would only be required to be in the building for a couple of hours - for the whole week! After our technical lessons on the studio, darkroom and a couple photoshop lessons a week, we were pretty much left to it. I for one was left wondering, what education am I paying for? My first year of Uni went by, it was tiring, stressful and frustrating at times but I passed everything and was just coming into the summer break when my Dad decided he was going to sell the house (there's a lot I could write here but I'll keep it factual) I asked him to keep me in the loop because I couldn't afford to live anywhere else. It didn't take long for the sales process to go through and he finally told me (when I asked about it) just as he was negotiating a final offer with potential buyers. I asked him if he would loan me some money from the sale of the house so I could carry on at Uni, but he refused. I was already so burnt out from the stress of having very little money and energy, my heart sank because I knew I couldn't carry on with my course with things as they were. Sadly, I had to defer, move back to where I was staying before and start again with the hope of saving enough money to go back to Uni the year after. In hindsight, I think the main reason why University is a good thing, is because of the contacts you can make that are associated with the University and the lecturers on your course. I did learn some useful things whilst at Uni but with the amount of time that I was left to it, I think it would have been more beneficial for me to have hired a private tutor or worked for a company that could teach me more on the job. I could have learned everything useful I was taught in that first year in a few weeks with intense, relevant training, tutor support and tasks. I would have also avoided the stress of my living and financial situation as it was at that time. Within a month of moving back I got myself a job working for Pixifoto. A company that's business model is with a mobile portrait photography studio and sales set up. As an employee you were given a van with all the kit you need, loads of training and shadowing time, then you're set free to work on your own. It was a fantastic way for me to learn how to take family portraits quickly, how to gel with customers and kids fast so they liked you and would smile for their 15 minute photo session. I learned A LOT both in good practices and not so good practices. I would have stayed with Pixifoto if it handn't been for how they treated me when my Grandad died. I decided that I would start my own portrait photography business and that's when Gemma Varney Photography was born. After a couple of years, I found that I was answering a lot of friends questions on Photography and I enjoy showing them the answer. I started Devon Photography Training a couple of years after going self employed. My main aim was to teach people all of the important information that had been helpful for me in my Photography and starting a business. I wanted there to be a way that people could learn what I had, without taking three years out of their lives and avoiding the stress that can come with going to University. With a lot of practice, refining and learning about different ways in which people learn (I took a level three course in Education and Training) I have a training business where I teach people in blocks of three hours, all the things they need to know about using their cameras, using a photographic studio, editing images, selling images, marketing, branding, and other general Photography and Business related information. I wanted to provide an accessible, affordable service that fits around people's lifestyles, no need to take three years out of their lives to learn the same information that I can teach in less than a month. Albeit there is plenty of practice needed to solidify what is learned. Devon Photography Training allows people to learn just what they need to know to get to where they want to be with their Photography goals. I have a no BS, straightforward and concise way of teaching with quality handouts, practical tasks and tailored sessions. No one gets left behind and I work around peoples commitments, so no one's lifestyle has to change to come and learn about Photography with me. My journey may or may not be unique to me, others may have learned more and loved their time within formal education. This is all just from my experience and I've been told it's good to share our stories. I hope to inspire and teach many more people how to use their camera's creatively. I LOVE what I do and LOVE that people come to me to help them with their Photography goals. #devonphotographytraining #learnphotography #howtouseyourcamera #devonphotographytrainingstory #privatephotographytuition #formaltrainingvsprivatetraining #qualitytuition #privatetuition When you first decide to take your camera out of Auto mode, the world becomes a scary place, so many values, fractions and 'F' numbers to get your head around. Balancing exposure becomes a problem that you have never knew you had before. So why bother, right? Well, switching out of Auto mode is the first step to full creativity with your image making, You can learn to create light trails, to freeze fast motion in your images, to show movement in photos and how to take abstract images that look like painting. Learning how to control the camera settings opens a world of possibilities and allows you to take images that many people just don't know how to take. Here are some example photos that you just can't take in automatic mode: Long ExposuresLong exposures are created when you use slow shutter speeds. Learning what the shutter is, what it does and how to use it is the first step in understanding this shooting technique. This photo was taken with a 15 second exposure time. We teach all students about this setting in our recommended first Photography tuition session 'How to use your camera and the basic principles of Photography' This is one of our favourite ways to create interesting abstract images. 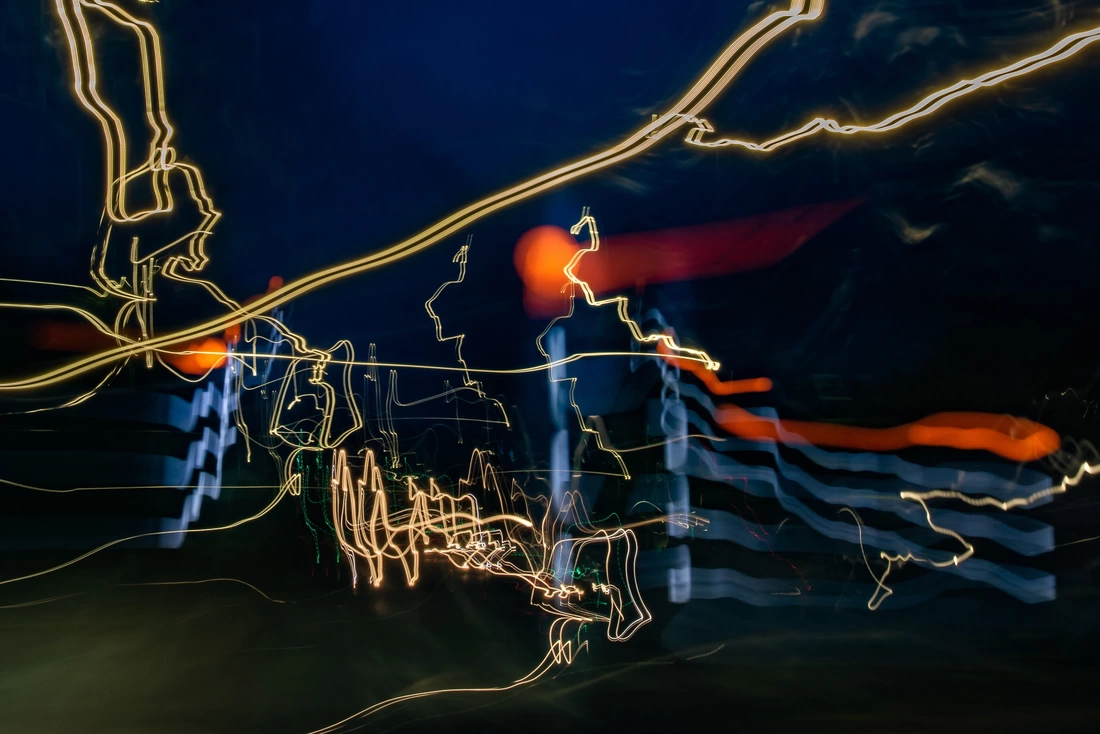 These types of photos are hard to take in the daytime without the help of an ND filter (a filter that blocks light from coming into your lens) but you can take these types of shots in the golden hour, when the sun is going down, assuming you don't shoot straight into the sun. You can also take them as the sun is coming up as there won't be too much light around to flood into your camera. Knowing how to balance your three main camera settings in crucial to getting this effect in camera. One of the perks of this type of Photography is that you always get a good quality image - because of how the settings balance. That means beautifully clear elements within your photo. Which we think is pretty cool. 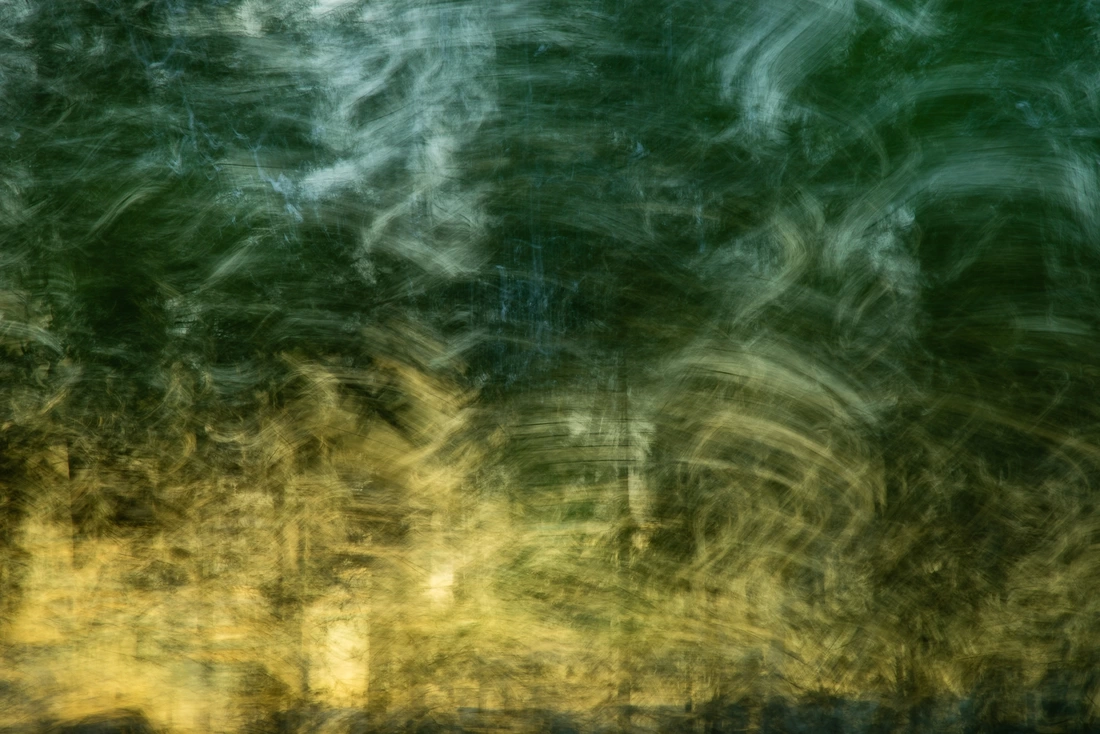 So why can't I take long exposures in Auto mode? I hear you ask, because your camera is always trying to take your photo as quickly as it can in your given scene, it prioritises getting the correct exposure quickly, fast enough for you to hand hold your camera without getting camera shake or movement blur. The auto mode assumes you are trying to freeze the movement of your subject - therefore capturing the moment as you see it. Super Detailed Landscapes Did you know that a lot of landscape photographers take more than one image to create their landscape shots? They use a technique called exposure bracketing. The reason for this is that most cameras can only record one light level at a time, which is great if your scene is flatly lit with not many shadows or highlights, but a lot of the best landscapes have a big contrast between light and shadow, and are hard to capture in just one photo. This technique, known as bracketing allows you to take a range of exposures, from really dark, to a little dark, to correct exposure, then slightly too bright, then really bright, all of the same scene. You need to use a tripod to keep the camera still and to get the same framing for each shot, and there are particular camera settings to use for the best results. But essentially, once you have all of your exposures, you can merge them together in Lightroom Classic to create one image with lots of detail in the highlights, shadows and mid tones. A pretty cool process, we think. Professional Looking Interior PhotosYou can also use the above bracketing technique for interior photos. This is for when you want to get the detail in the bright areas outside and the dark areas inside the building. For rooms with big windows and gorgeous views. This is a technique we teach estate agents and property photographers to do as part of our workshops. Ping us an email if you want more detail about this.  Prioritising Image QualityThe image quality is determined by one of the camera's main settings and you can control this when adjusting the balance of settings for certain scenes. When you use a tripod your camera doesn't know it's on a tripod and therefore will still balance your settings as if you are hand holding, taking the photo quickly to the detriment of the image quality - especially in low light. When you take control of your settings, and especially when you are using a tripod or have a lot of light to work with, you can use the best quality setting so your photos are sharp, distortion free and beautifully detailed. 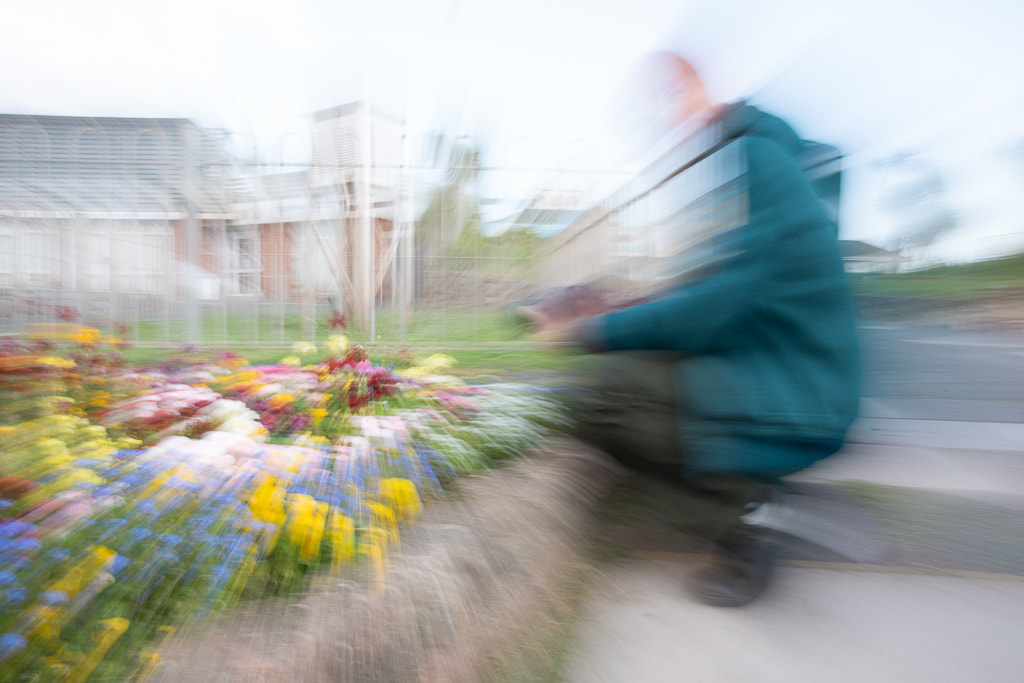 Pop Up FlashIsn't it annoying when you're trying to be subtle about taking a photo and then the annoying flash pops up? This happens in auto mode when your subject is backlit or when there isn't much light, not ideal if you're shooting where you're not supposed to be, I'm talking art galleries or museums for reference photos, I dunno what you're thinking... Anyhoo, when you shoot in semi automatic modes like shutter priority, aperture priority or manual mode, the flash only comes on when you tell it too. No more annoying flash popping up and exposing your poor ninja skills.  Exposure CompensationYour camera records light, and when it comes to exposure (the brightness value in your photo) the camera is designed to record the light level of your scene by providing an average reading across the highlights, shadows and midtones. The camera is designed to make your most common light level in the scene a midtone, which can be problematic shooting in the snow or against a dark background, for example;
When your camera view finder is filled with a field covered in snow, the camera records the light bouncing off the snow as a midtone, darkening the overall image, it is designed to do this so that, in theory, your highlights and shadows fall either side of the midtones. When in auto mode there is nothing you can do about this, but if you shift to shutter priority, aperture priority or manual mode you can rebalance your settings to brighten the exposure to make the snow look white again. This is what is known as exposure compensation. The same sort of thing happens when you fill the view finder with a predominantly dark object, like a black dog or wall of tyres. Your camera records the mass of dark tones as a midtone, making it a lighter grey exposure. You can adjust for this in the semi automatic modes; shutter and aperture priority or manual mode. You cannot make exposure adjustments in automatic mode. To learn more about your camera and the basic principles of Photography pop your details in our sign up form here. Take your Photography to the next level with our Online and Face to Face Lightroom Classic Photo Editing Courses
We will teach you exactly what you need to know with our eye-opening and easy to follow courses. You will learn the exact steps you need to take to ensure your photos are organised, culled and edited in an easy to use and repeatable way. No more searching through folders named by date with no clue as to the folder contents. Say goodbye to stressful photo editing sessions No more hours spent wondering why your photos aren't coming out the way you want them too. You will have all the tips and tricks necessary to get professional grade photos in no time. You will gain confidence and a good understanding of:
We run group sessions over 5 weeks and 1-2-1 sessions face to face and online - all lessons are supported with worksheets and homework tasks. We use a private Facebook group to interact and share our work, the link to this will be sent a day or so before the course starts. The cost varies between £75 and £169 for the session. Online evening courses are ideal for busy people as you don't have to watch the sessions live and replays will be available until the end of the course. If you're interested in a group evening course click to sign up here. Or if you want to take the course as a 1-2-1 then pop in your details here. Gem runs beginners Photography evening courses at Teignmouth Pavilions throughout the year. With follow up improvers sessions running regularly too. All Photography workshop dates and session bookings are taken by the Pavilions, find out more info and sign up at The Pavilions Website by clicking here. Here are a few shots from our first ever improvers session: Take your Photography to the next level with our Online and In Person Photo Editing courses Gem will teach you exactly what you need to know about Photoshop to edit your photos to a professional standard. Photoshop works alongside Lightroom Classic (which I would recommend learning before delving into Photoshop). Stop learning by trial and error - Save time and money and book a three hour session with Gem. A recent student told Gem that he had learned more in 3 hours than he had in 15 years of using Adobe's editing software! With our eye-opening lessons, you will learn to confidently improve your photos with little stress. All sessions come with worksheets and/or video tutorials or screen recordings of what we cover in your session so you can refer back to them when necessary. We will delve into: * Using layers, adjustment layers, layer masks and pixel based layers. * Using layers with different blending modes * A look at the different tools available in photoshop * Warping images using liquify * Cropping and aspect ratios * Edit blotchy skin and desaturating red skin tones * Skin Retouching * Smoothing hair with the Clone Stamp * Removing distractions using the patch tool and content aware, (good for studio background expansion & background distractions) * Resizing your images * Making global and local adjustments to your images The cost varies between £75 and £169 plus fuel depending on if you are learning online. in a group or face to face as a 1-2-1. If learning face to face you can bring along a friend for one of your sessions half price. Click here to sign up Or if you want to take the course as a 1-2-1 the sign up here   Learn the fundamentals of Photography and how to use your digital camera with our group sessions and 1-2-1 Photography Lessons in the South West of England
Learn by doing! Our courses are designed to teach you the most important photography principles through hands-on experience and practical tasks. We will teach you how to use semi-automatic and manual modes to take sharp background photos, blurred background photos, light trail photos, movement photos, and crisp 'frozen' photos. Get Expert Guidance - You will get one-on-one guidance to help you reach your full potential and Gem will be there to help you every step of the way. Gem will also provide helpful tips on composition, setting your camera up for your particular eyesight and many more little gems of information to make your shooting easier. Unlock Your Creativity - At Devon Photography Training we believe that everyone has an untapped creative potential waiting to be unleashed! Our courses are designed to help you unlock that potential and give you the skills needed to create amazing photographs, that look how you imagined they would, without the feeling of it being a lucky shot! We will explore:
All makes of digital cameras are catered for, anything with a mode dial or mode selection options. If you're unsure if your camera is suitable, sign up and I'll double check your camera when I get your entry form. (Pretty much every digital camera is suitable) You will have worksheets and homework tasks to support your learning and also an invitation to our Facebook group where you can watch all our live demos, chat to other photographers and generally get involved. You can sign up for a 1-2-1 lesson at our Honiton based studio or at your home on this page. Or join our evening courses at Teignmouth Pavilions by checking out any available dates on their website here. Thanks to all the awesome people who made these photos so much fun to take! Feel free to save these images if you want to use them with the watermark. For high resolution images with no watermark please send £2 per desired image to [email protected] via Paypal and in the purchase notes write which corresponding image numbers from the slideshow you would like and your email address so I know where to send them. If you would like all the images you can have them all for £20. Example below: 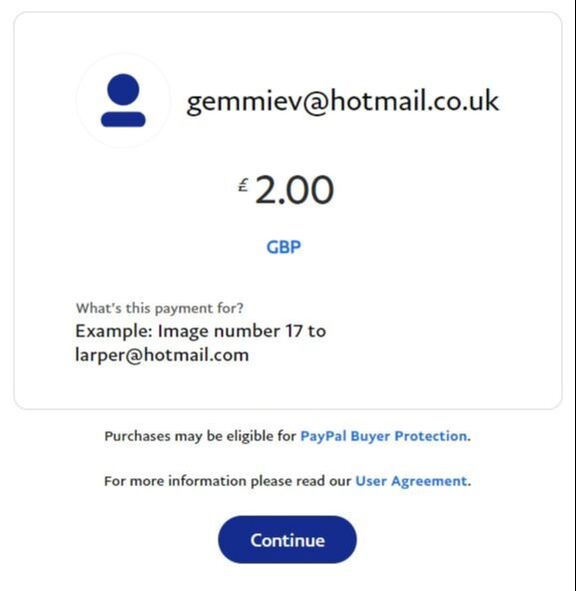 I hope you enjoy these images as much as I enjoyed taking them. If you need photos for any other events, or would like some studio photos have a look at my 'Photoshoots' tab above or ping me an email.
|
Our Mission Statement:
|
 RSS Feed